

Buy anything from 5,000+ international stores. One checkout price. No surprise fees. Join 2M+ shoppers on Desertcart.
Desertcart purchases this item on your behalf and handles shipping, customs, and support to British Virgin Islands.
๐ช Transform your woodwork into a timeless masterpiece with Tru-Oilโs pro finish!
Birchwood Casey Tru-Oil Stock Finish Kit is a comprehensive 9 oz professional-grade solution designed to refinish and protect gun stocks with a rich walnut stain and durable satin finish. The kit includes all necessary materialsโstains, conditioners, sandpapers, steel wool, and clothsโbacked by decades of trusted quality since 1948, ensuring a smooth, weather-resistant, and fingerprint-proof finish that enhances wood grain and longevity.


| ASIN | B0014VROMQ |
| Best Sellers Rank | #6,647 in Sports & Outdoors ( See Top 100 in Sports & Outdoors ) #93 in Gun Cleaning Kits |
| Brand | Birchwood Casey |
| Brand Name | Birchwood Casey |
| Customer Reviews | 4.8 out of 5 stars 6,762 Reviews |
| Global Trade Identification Number | 00029057238013 |
| Included Components | see descritption |
| Item Type Name | Birchwood Casey Tru-Oil Stock Finishing Kit |
| Liquid Volume | 9 Fluid Ounces |
| Manufacturer | Birchwood Casey |
| Manufacturer Part Number | BC-23801 |
| Model Number | BC-23801 |
| Set Name | Gun Stock Finishing Kit |
| UPC | 029057238013 |
| Unit Count | 1.0 Count |
| Warranty Description | See Manufacturer |
M**W
Wonderful Stuff!
I love this stuff, and I can't find enough things to use it on! Stocks are just the beginning! Tru-oil is absolutely wonderful stuff! Now when I say that I'm polishing my wood, it isn't a euphemism! I'm a pretty handy guy, but I have moved a lot for work and always rented, so I never had a lot of household woodworking projects to do. I wanted to NICELY refinish a gunstock, but I have never really worked with wood much. I did a LOT of research to try to find a nice method of completing my task and I got a dozen conflicting pieces of advice. Eventually I settled on Tru-Oil, partially thanks to my uncle's recommendation (why not try to trust family above internet forums, right?), partially because of the price, partially because it was designed to preserve gunstocks, and partially because it was one of the easiest finishes to remove if I didn't like it. I am SO GLAD that I used tru-oil. This stuff is great! It really isn't that difficult to work with if you take your time, and the results are amazing! The grain in my stock catches the light and shimmers like a polished tigers-eye gem! I'd add a picture, but I can't take one that does it any justice. And it could have been even better if I had more experience. My impatience and inexperience left a few streaks and such. One day I'll refinish all my old guns to match, and I'll use Tru-Oil along with the lessons I learned in my first attempt. Some tips I learned in my first attempt: 1) Thin coats. Lots of them. A little goes a long way. I got in a hurry and ended up with some heavily-oiled areas and drops that I had to sand down, and I never got it all to match perfectly again. 2) Prep. I did a pretty good job of this, but I see how important it was. Your wood should be very well prepared and sanded super-smooth before starting. 3) WEAR GLOVES - the tru-oil does not wash off easily with regular soap and it took forever to get it off of my hands. After the first coat I started using latex gloves and cleanup was much easier. 4) If you use the stain, be very careful to do everything in one batch and in one pass. The stain's intensity multiplies with each brush stroke, so it is important to be completely even-handed. 5) If you don't have one, try to rig up some kind of drying rack so that you can coat a whole piece at a time rather than one side at a time (I used some folded cardboard to make a stand that only touched upon the unfinished surfaces). 6) You'll need more 0000 steel wool and rags than come with the kit. Possibly more sandpaper too. There is plenty of oil to do a few rifles. 7) The tru-oil by itself was too slick and shiny for my liking, the B.C. conditioner and wax just tidied everything up perfectly. I'm hooked and I highly recommend this stuff. I hope that helps.
A**1
Birchwood Casey Tru-Oil
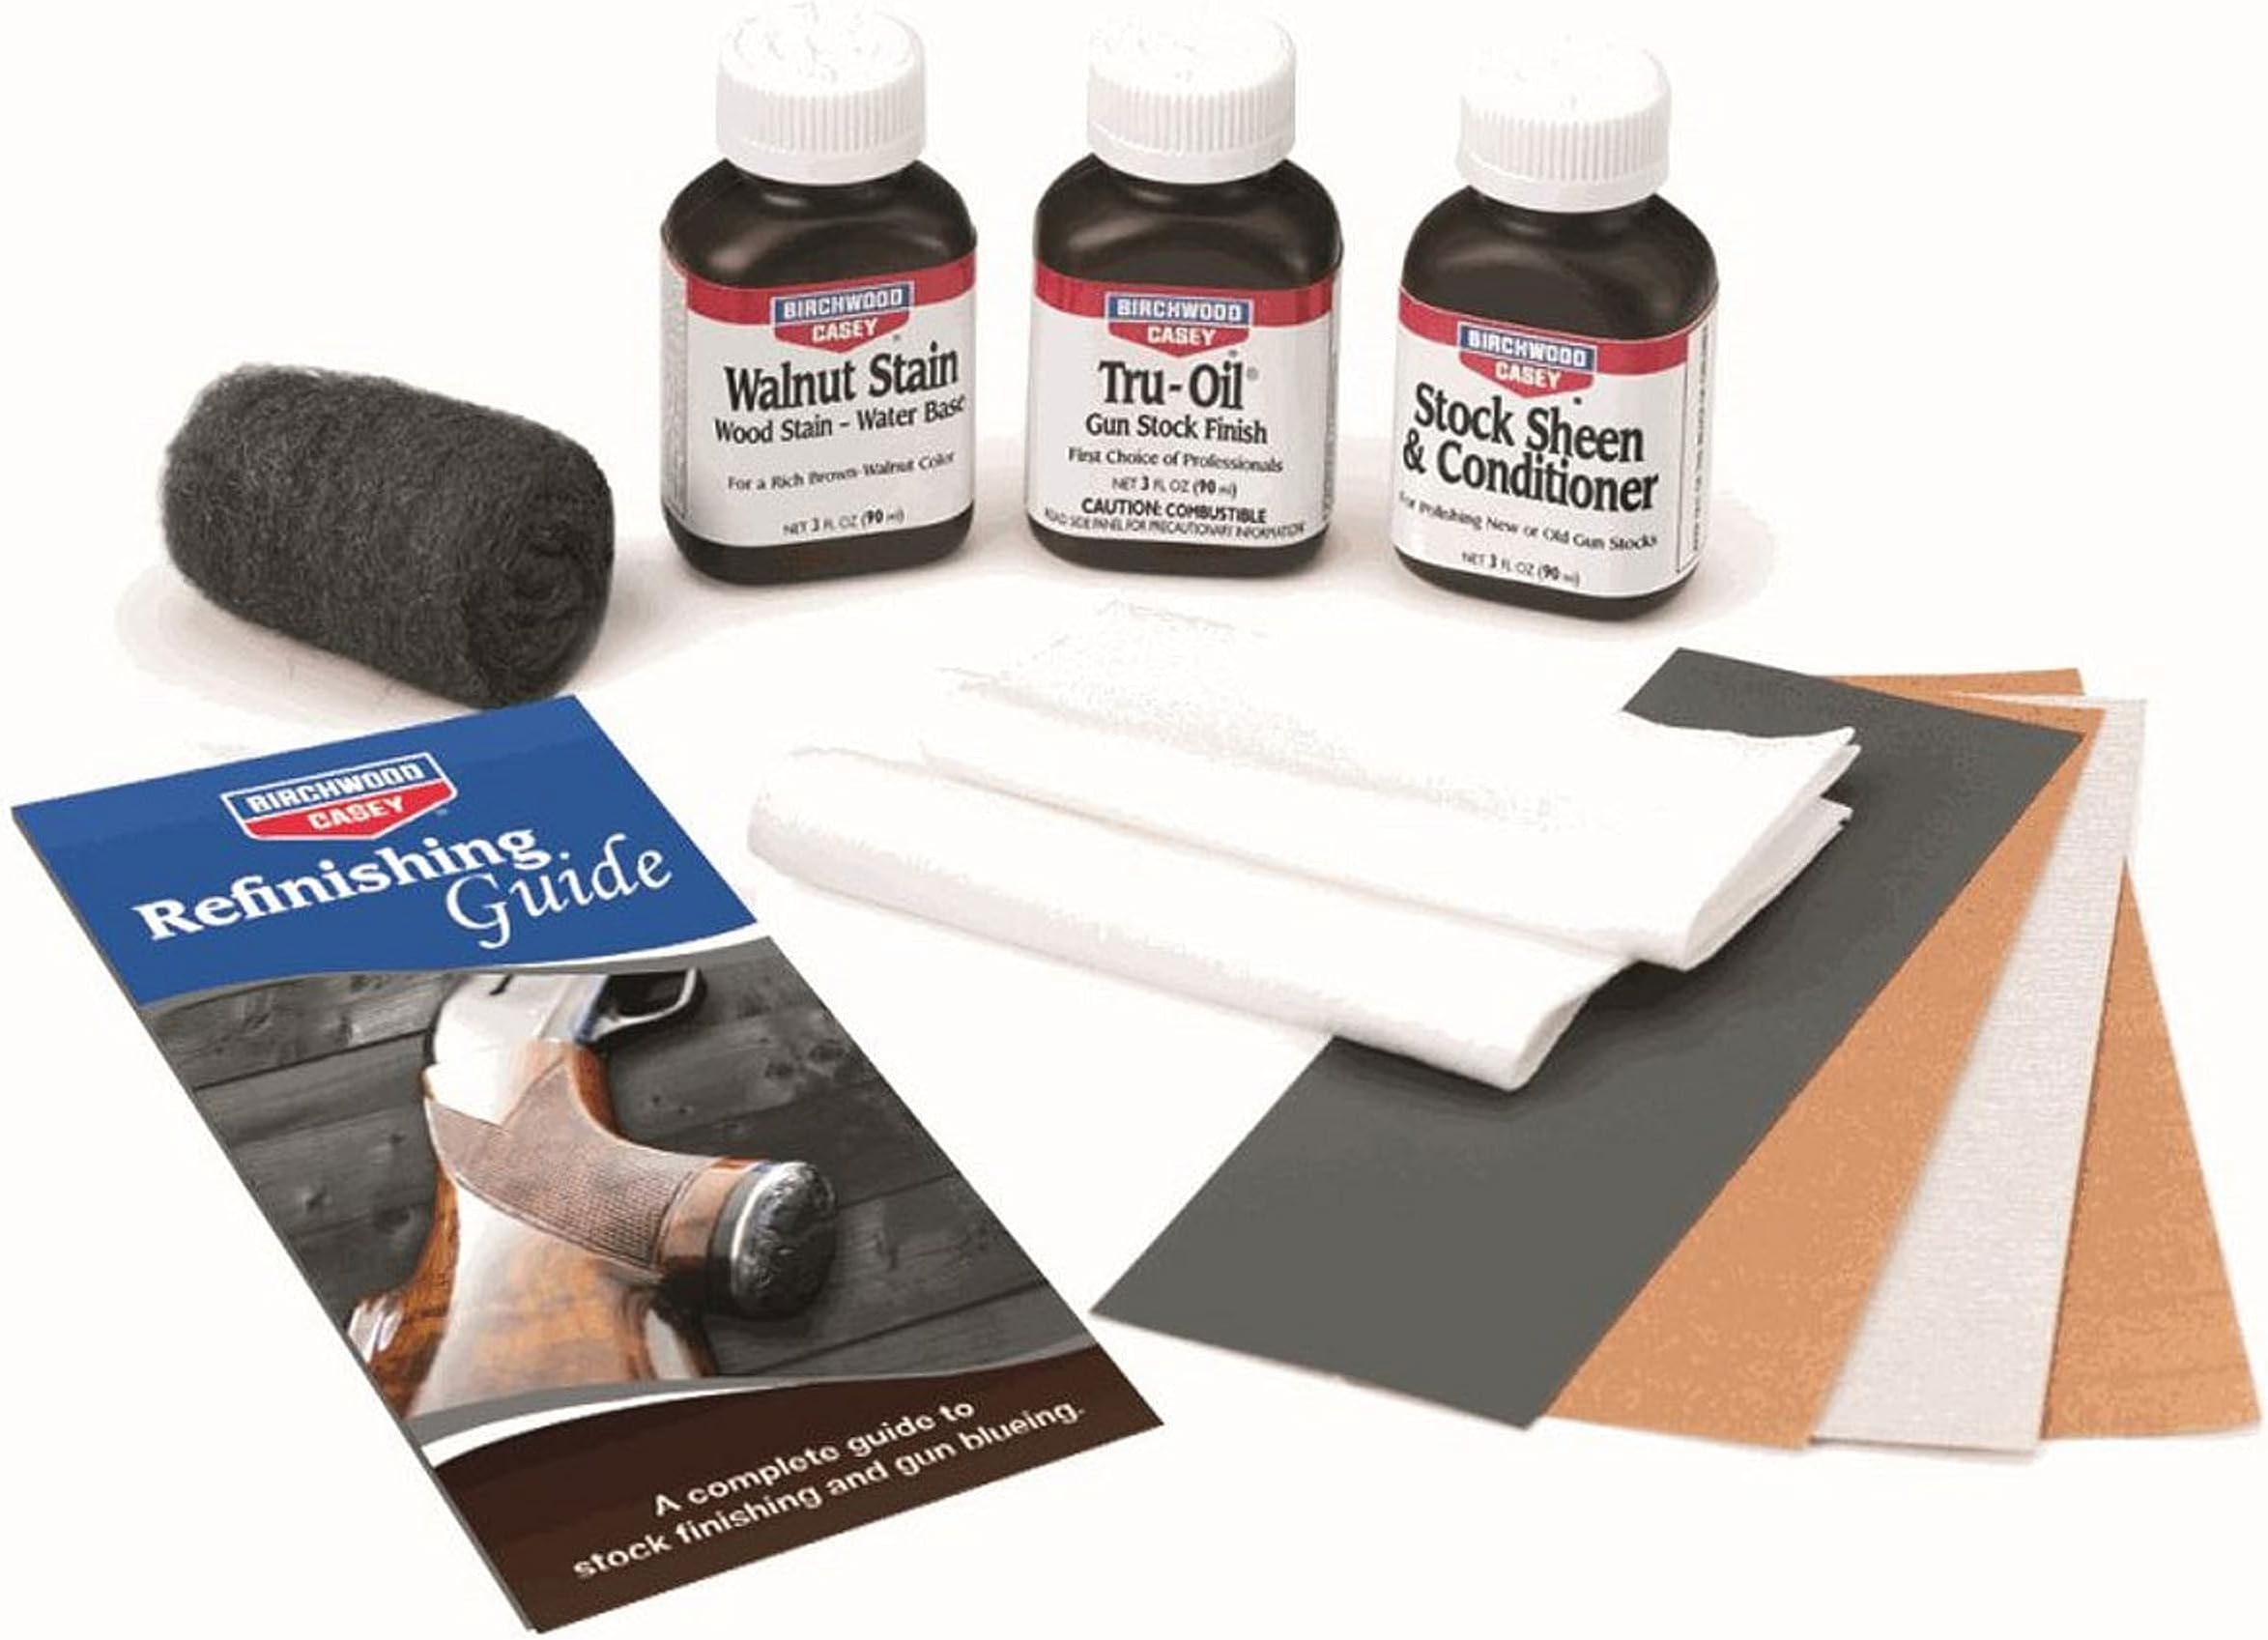
I was fortunate to purchase a strat style bolt kit from Carvin/Kiesel Guitars in early 2020 right before they were discontinued. These kits were easy to assemble into very playable instruments, at about the same cost as an entry-level Fender Strat. I ordered a mahogany body and a maple neck. Once the kit arrived, the main decision was which finish to use. But this was also a chance to kind of make the guitar my own. The instructions recommended tung oil as a finish becaus it's easy to apply and also brings out the character of the wood. The downside seems to be that it doesn't offer much protection. I also considered a polyurethane finish, which is pretty widely used on electric guitars, but noticed some comments about it reducing ability of the body to resonate. Even though the sound is almost entirely coming from the pickups, I enjoy a very resonant instrument that feels "alive" when you play it. A number of posts on guitar-building forums recommended Tru-Oil because it can bring out the character of the wood, be built up to offer some protection, and not dampen resonance. I went with the Tru-Oil for both the body and the neck and have been extremely happy with the result. Visually, the mahogany and maple each pop in their own way. The body resonates strongly and produces a confident tone unplugged (for an electric). The neck feels smooth and not sticky, like a gloss poly finish might. The finish has been durable enough that I haven't felt the need to retouch it at all yet. Note that I am just a home noodler; a gigging musician might put more wear on a finish. Before applying the finish, I watched hours of YouTube videos to see the kinds of techniques people use, and then came up with a plan. Before I applied finish to the guitar, I tested it on some pieces of scrap maple and mahogany. Both the body and the neck were worked to a semi-gloss over 12-13 coats. The first 3-4 coats on each piece were done with rags to absorb into the wood. Subsequent coats were applied with sandpaper, progressing from 400 grit ("grain filling") to higher grits ("polishing"). Then, after noticing some debris and scratches in the finish, I sanded back down and built up some additional coats. The final coat was applied with a coffee filter and polished up to a semi-gloss. I waited at least 12 hours after each coat before applying the next one. After the final coat, the body and neck were left alone for about a week to let the finish cure. This was all done in an apartment with just a standing fan for ventilation, and fumes didn't seem to be an issue. Some of the finish tended to get stuck to my fingers after each session. I tried using latex gloves at some point, but they would just kind of disintegrate. I found that scrubbing my hands with WD-40 after a session helped to remove the residue. This was my first time applying a finish to anything, guitar or otherwise. It took some patience and some troubleshooting when flaws became apparent. If you plan your approach, take your time, and don't rush through the process, I don't see any reason why you can't get something you are satisfied with. I recently made a DIY coffee table from Home Depot pine boards and a set of hairpin legs. The table top is something like 4 feet long and 2 feet wide. I was curious to see if I could get a good finish with Tru-Oil. It did an excellent job of bringing out the character of the wood, and gave the white-ish pine a much warmer hue. But this time I didn't quite get the same protective layer of semi-gloss on top. The pine seemed to drink up a more of the finish than the hardwoods on the guitar, possibly just because it's a much larger piece, and I got fewer coats in with a (8oz) bottle. I was also much less patient this time with sanding the wood and perfecting the finish. I am happy with the result, but for future projects like this I would consider trying something like tung oil + wipe on poly for beautification and protection at a larger scale. And perhaps investing in an electric sander.
S**T
You Know What It Is
Like many guitarists, my favorite neck finish is oil and wax. I build most of my own guitars, and Tru Oil is my finish of choice for the necks. I sand the shaft to 400 and polish the headstock face and fretboard to 800, then apply 4 light coats of Tru Oil 24 hours apart. I even finish rosewood fretboards with it to prevent moisture loss. This is wonderful stuff. It applies easily, looks great, feels great, and is very durable. Should a touch-up be needed, you can apply it over itself with effortless, seamless blending.
F**R
Good results on a wooden fountain pen
I bought a fountain pen a couple of years ago that was supposed to have come with a gloss finish. It did not. In fact, it did not appear to have any finish on it at all. I saved the pen and thought that I might refinish it someday. Then I came across the Tru-Oil. I had used this stuff clear back in the 1970s on a .22 cal. Wards Western Field rifle. I remembered it having done a pretty good job on the rifle so I tried it again, but this time on the fountain pen. The barrel and cap of the fountain pen are made of California Buckeye Burl. This appears to be a type of precious hardwood that looks a lot like marble. If you get a good enough finish on it, then it definitely looks like marble or maybe even better. One drawback to the wood in the pen is that it does contain some pits and other flaws. Probably for this reason, it took several coats of Tru-Oil to do the job. Multiple coats of Tru-Oil will eventually fill most imperfections in the wood. I used the index finger on my right hand to apply the Tru-Oil. I used fine steel wool between coats. I'm not sure of the coarseness of the steel wool because it just said "finest" on the package in English and then some other things in other languages. The trick to getting a beautiful finish seems to be first to get the wood completely filled and then to apply the top coat evenly. The top coat was very tricky for me and I had to do it over a couple of times to get the finish that I really wanted. I think the trick is to rub the Tru-Oil on very quickly and as thin as possible. You can feel the Tru-Oil quickly getting tacky. It sets up very quickly. Keep your finger moving and use the least amount of finish as possible. With practice, you can level the finish by skimming your finger quickly and lightly over it. But don't try to do this too long when the finish starts to get tacky. The grain of the wood in the pen I finished with Tru-Oil has a translucent 3-dimensional look. Some of the grain looks 1/16" - 1/8" deep. This reminds me of looking at the designs inside glass playing marbles that we had when we were kids. We were good at playing marbles and we had about a gallon of them saved up at one time that we had won in marble games at school during recess and lunch hour. The top coat of Tru-Oil on the pen is extremely high gloss. It's as smooth and bright as glass or even better. I have an Eastman mandolin that has a lacquer-over-spirit-varnish finish on the maple wood back of it. The maple on the back of the mandolin is flamed maple, like a lot of violins and some guitars. The finish on the mandolin has this same 3-dimensional look. I'm waiting to see how well the Tru-Oil finish holds up on the fountain pen. Fingers produce acid and oils and it will be interesting to see how this affects the Tru-Oil. At any rate, the finish looks very good and this is only the second time I've used the Tru-Oil. I think doing a gunstock should be easier than doing a classic fountain pen. If there is anything that could use improvement with the Tru-Oil, it would probably be that it could flow out a little more easily. I like the idea that it dries fast (you are supposed to be able to apply the next coat after 2-3 hours), but I find it a little difficult to flow it out evenly on a surface like this fountain pen. Anyway, the finish on the pen turned out very good, I think. It's interesting to see all the applications that people are using the Tru-Oil for besides gunstocks.
-**N
A great product. I highly recommend it!
First of all this is a great product. I highly recommend it! Iโm using it to finish a guitar Iโm building and finding tons of conflicting information on how to use Tru-oil. Maybe this is due to its popularity + everybody has an opinion. I heard one guy on YouTube say it was not self leveling. First of all, forget self leveling. Self leveling sounds great but is very misleading. Tru-oil is as self leveling as anything out there. Think of it as a very thinned out polyurethane that you apply in super thin coats. It consists of 56% mineral paint thinners, 33% oil varnish, and also 11% linseed or Tung oil, again as self leveling as anything else. OK, so considering all the above, in order to get the smoothest shiniest finish I apply Tru-oil in very, thin coats and sand between each coat with 1000 โ 7000 grit sandpaper or above (because of the possibility of a raised wood grain I used 320 - 400 grit sandpaper after the first coat only). Even after using the polishing grits (1000 grit & above) of sandpaper between coats there was no problem with coats not sticking to each other (delaminating) I put on enough coats until it looks professional, even & shiny (usually between 15 and 30). So far Iโve been applying (rubbing in) the coats with my bare fingers as it says in the instructions). I stop rubbing the finish in when it still looks smooth yet starts to pull on my hands the tiniest bit. I donโt rub the coats until itโs sticky and pulling as some people suggest. Quite honestly, I think the sanding between coats to get rid of imperfections is the most important thing, along with a very long cure time (2 weeks to a month) before buffing. Also note: I read a negative review before purchasing this product. The negative review said that it didnโt truly cure and a way to test this was to put masking or duct tape on the finish and wait for about 20 minutes and pull the tape off. I tried this on my tests & found that the tape didnโt affect the finish at all. Just as shiny as ever (I was expecting a tiny bit of residue with the duct tape but even that was beyond minimal) & no delaminating at all. Take note that I all my Tru-oil tests were done over dyed wood on Flamed Maple. Final thoughts. The wood you are working with must be perfectly sanded before using tru-oil. I go up through the grits ending up with 320 โ 400 for my final grit before staining and applying the tru-oil finish. In my experiments over the past few months, I found that thinning with gum turpentine or mineral spirits was not necessary. In fact I found that thinning with gum turpentine dulled the final results a bit.
G**R
Affordable. Simple. Easy. Reasonably fast.
This is a convenient quality product. If you do not want to mix your own linseed oil and beeswax, then buy this stuff. This is certainly a quality product that works as advertised. I use it for finishing some guitar necks where it works beautifully. Depending on your tastes and needs, you might find this slower than homemade concoctions since the oil has been heat treated to make it thicker. That's great for gunstocks that will be exposed to moist morning air or rain, but not always so great for guitar necks, especially if you are in a hurry. The viscosity requires greater curing time between coats. It's still faster than cure times for lacquer, but nowhere near as fast as shellac or thinner homemade oil-wax blends. If you need maximum protection for guitar necks, any wipe on poly is good. Some players just prefer this "natural oil" feel. Also, you can make poly finish feel smoother by sanding with white buffing pads after the finish dries, so keep that in mind if you need more protection but also want the smooth "fast" feel. After three fully cured and carefully buffed coats, it develops a lustrous sheen just shy of full gloss, yet feels almost as smooth a bare 400-grit sanded wood. I keep some around for doing guitar finishes for some friends, but warn them that each coat takes at least a day to fully cure and several coats are needed on Maple. Mahogany, and exotic woods require even more coats. I have not tried it on very open grained woods like Oak nor on any softwoods. I have used heated drying cabinets with this stuff and found I must use more thin coats rather than fewer thick coats since the forced heat-cure makes the oil "weep" and get sticky. So, take that as a preventative warning. You can learn from my experience. Nothing terrible happens when the oil weeps. You just have to be patient and wait for it to fully cure, one layer at a time as the directions say. It's simple, practically foolproof and super easy. No special equipment needed; just some soft cloth or linen. You can even use paper towels so long as they are the sturdy blue shop-towels. Of course, as with all oil finishes, you want to wet the used rags after use or open them completely to dry to avoid possibility of spontaneous combustion. I've been finishing wood instruments for over fifty years and never had a rag catch fire yet, but still, better safe than sorry. This is also one of the easiest finishes to renew or repair. Just sand any divots or bad patches, then apply more. It blends perfectly and buffs evenly. In short, this is convenient because you do not have to mix your own ingredients. It is ideal for wood that will contact some, but not much moisture. It is not quite as fast drying as my homemade finishes, but it is every bit as high quality. It does not provide maximum protection against moisture like poly, but it is more than adequate for gunstocks and most guitars, assuming you don't row boats with your axe or sweat like a republican at a hearing. I consider this one of the two easiest wood finishes and it sure is pretty on any good hardwood. Affordable. Simple. Easy. Reasonably fast.
G**.
M1 Garand Stock finished from CMP
FIRST... Open your bottle by using a punch to make a small hole in the foil. This helps eliminate or reduce those โbitsโ or โboogersโ you get around the opening of your bottle and eventually in your finish. You only use a small amount so that small hole is perfect for getting a little out. You see those boogers discussed and/or strained out in a lot of YouTube instructional videos, so it looks like this reduces that. This is my first stock finish. I watched and read hours and hours of how-to and instructional videos and articles. What Iโm going to describe worked for me, but I always advise doing lots of research. This should work for gun stocks and guitar bodies. Thereโs also great videos on using steam and heat from an iron placed over a washcloth to pop out dents and dings. I did it to remove two small dings and a scratch and I was amazed how well it worked. It only needed light sanding after that to even out. It basically raises the grain of the wood. SECOND: Sand the wood smooth until itโs smooth and ready to use the tru oil. I sanded mine with 400 grit wet/dry paper AND in my final sand I left the wood dust all over the stock. I reduced the tru oil 50/50 with mineral spirits to thin it so it penetrates. I worked the oil in with my bare hand and it mixed with the dust to create a โslurryโ that I worked in to the open pores in the grain (those black spots). I made sure just enough and rub it in with my whole hand till my hand felt warm. Too much will sag, drip, etc and take forever to dry. *I sprayed my hand with WD-40 AFTER each coat then washed with dish soap. The WD-40 breaks down the tru-oil on my hand well. THIRD: After the first coat was dry 12-24 hours, I lightly โsandedโ with 0000 steel wool to dull the finish and remove any imperfections. I didnโt have any imperfections, but if I did I mightโve also used the 400 grit sandpaper also. This time I used the same 50/50 mix and I used a little more and sanded with the 400 grit paper while it was wet. It created more slurry that I worked into the remaining open pores. As always, I sanded with the grain. I rubbed it in again using my hands until my hands felt warm and it was lightly tacky. Fourth: After that second coat was dry, I used the same steel wool, wiped off with a lint free cloth and applied the third coat full strength by hand again. Rubbing in the same way with the grain. Itโs only lightly tacky after each of these coats. Fifth: Repeat the last application two to ten more times. Thatโs up to you. Mine looked amazing after the third coat, but I ended up doing five total applications. Six: After the final application you can decide if you want to leave it as is, buff it with a compound, steel wool, a scotch brite pad, etc. to dull it to a satin and/or seal with a gun stock wax. Iโm still deciding. The โproperโ finish for an M1 is probably satin, but this gloss looks really nice. Best of luck!
J**S
Amazing results!
This kit and company is still #1. I will never use anything else. The quality results i get are to die for. Once its all said and done it not tacky or sticky. I absolutely love the control of shade you have. No matter how many coats you do, if you want it a bit darker? Put another on. Let it dry thoroughly. Dont over saturate but if u do sand and repeat. Definitely wet sand after 4 hours of first coat to get a self made wood filler with same color. It is high gloss when finished but not sticky at all. Smooth to the touch. Slides in my palm when spinning my revolver. Looks store bought. I had my son burn a design in a set of triceratop wood grips i bought on here and even the burnt wood absorbed the stain. Just dont use cotten or felt. Dont polute ur finish with fabric debris. Using ur damn fingers and rub each coat in nice n firmly. After about 5 coats i got a rich dark walnut shade. Amazing!!
C**N
Perfecto para guitarras
Realmente es fรกcil de aplicar y se obtiene un buen acabado. En mi caso lo utilice para repintar el cuello de una guitarra elรฉctrica y me ha gustado mucho como quedo. Por otra parte es bastante rendidor.
A**E
Great product
My father has used this product for years restoring old gun stocks. He suggested it when I asked for a product to spruce up worn patches on a hardwood floor. Works a treat and a little goes a long way.
D**L
Excellent product.
Have used this on two walnut gunstock and multiple knife handles. With multiple coats and fine sanding you can achieve very nice high gloss finish. Or satin finish with fewer coats. Dries quickly and not too smelly. Highly recommend. Thier gun blue works very well too.
X**U
ไฝฟใๅๆใ่ฏใ
ไบบๆฐใชใฎใๅใใใพใใๅใใใญใใใชใใๅ ๆฒขๆใ็กใใ้ธในใฆไฝฟใๅๆใ่ฏใใ่ถๅบใใชใไปไธใใฏ่ใๆถฒใงๅธ้ใใฆใใ่ๅกใใใใใใใงใใ่ใฏ็ฌ็นใชใฎใงๅฃใใชใใใใซๆฐใใคใใฆไธใใใไธญ่ใ็ชๆฅๆใง็ฉดใ้ใใใ ใใซใใชใใจๆฎ็บใๆฉใใฎใงๆณจๆใๆตทๅคใฎไบบใซใใใจใใฃใใ็ฉบๆฐใๆใใฆๅท่ตๅบซใชใฉใงไฟๅญใใใฐ้ทๆใกใใใฟใใใงใใใใฉใใฃใซใ ใใฉใใใฟใชใฉใ1cm่งใซๅใฃใฆใ็ฉบๆฐใๆใใฆใใใ็ฉบใใ็ฉดใซใบใฃใใใจๅธใใคใใใๅผตใไปใใใฆๅฏ้ใใ่ใใใใจๆฎ็บใใซใใ่ฏใใใจๆใใพใใ
W**G
also a good thing. As to the product it self
First of all I got it both when promised and expected. Second the price per oz was within a few cents of what I get from a local Lee Valley store. The sizes where different. My order was free shipping, also a good thing. As to the product it self, I am very pleased with the result over stained figured wood. Actual very pleased with the products performance, ease of use, and results. I would use it again and order from these folks. Project was a guitar body black limba.
Trustpilot
2 weeks ago
5 days ago