We remain fully operational. Our teams are working around the clock to ensure your deliveries continue safely.

Descargar la aplicación


Servicios al cliente
Sobre nosotros
Copyright © 2025 Desertcart Holdings Limited
Descargar la aplicación


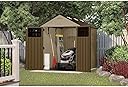
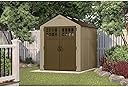

🏡 Elevate your outdoor storage game with strength, light, and security!
The Suncast 6' x 8' Heavy-Duty Resin Storage Shed in Sand offers 306 cubic feet of durable, weather-resistant storage space. Constructed with double-wall resin panels and a metal-reinforced roof, it withstands heavy snow loads and outdoor elements. Skylights and door windows provide natural lighting inside, while a reinforced floor supports heavy items like tractors. Lockable doors secure your belongings, and the shed’s design allows for straightforward assembly with minimal tools. Ideal for professionals seeking a reliable, stylish, and functional outdoor storage solution.


| ASIN | B006DJDAMM |
| Base Material | Resin or PVC |
| Brand Name | Suncast |
| Color | Sand |
| Customer Reviews | 4.2 4.2 out of 5 stars (165) |
| Door Height | 72 Inches |
| Door Style | lock |
| Door Width | 57 Inches |
| Frame Material | Vinyl" or "Polyvinyl Chloride |
| Global Trade Identification Number | 00044365019109 |
| Item Weight | 275 Pounds |
| Manufacturer | Suncast |
| Manufacturer Part Number | BMS6800 |
| Material Type | Polyvinyl Chloride, Vinyl |
| Model Number | BMS6810D |
| Required Assembly | Yes |
| Style Name | Outdoor |
| Top Material Type | Resin |
| UPC | 044365019109 |
| Water Resistance Level | Water Resistant |
B**E
Good value, easy assembly, protection from weather, not much security
Delivery, Packaging, and Contents: Delivery was on time, as scheduled. It arrives in two large, sturdy boxes. Mine arrived undamaged. I checked the contents against the parts list (except screws, washers, etc.). I did later discover I was missing two screws for the hinges, but I had some that worked and even if I didn't have them, I could have picked up a couple at the hardware store for less than fifty cents. Assembly: Instructions call for two people, I did it myself in about 4-5 hours, taking plenty of breaks (it was 95 degrees outside). I also prepared the pad location prior to delivery. The assembly instructions were decent. Parts were well-labeled and corresponded to the parts list and assembly diagrams. Aside from the special tool they include for the proprietary wall screws, the only tools needed are a screw driver, common sizes of wrenches and sockets. Sub-assembly of the roof supports took about an hour. The only gripe I have with the instructions is that it doesn't make clear to assemble two. Skip ahead a couple pages and see that it calls for both to be assembled before installing them. No big deal. The base and walls went up quickly. *Make sure your pad or foundation is level*. A second pair of hands would have made the roof installation easier, but it wasn't overly difficult to manage alone. Doors and hardware went on easily enough and the doors lined up properly with each other on the first try (thanks to level foundation). The left door has sliding pins top and bottom to secure it closed. The right door locks to the left door by passing a lock through holes in the outside handles, there is no latch and the handles aren't all that robust. If you need more security, choose a different shed. This one will only deter opportunists. Short story; Overall, the shed assembled easily, is priced reasonably, and will do a good job keeping your stuff out of the weather. It's not a security shed.
S**T
It's okay, looks good, and holds a lot of stuff.
Just finished the last part of the assembly, installing the doors. It took me about 3 days doing it myself a little bit at a time. I took a star off for some parts being a bit warped, and excess plastic molding pieces needing to be cleaned off from mating surfaces or covering holes. We don't get much rain here in Vegas, so I'm not too worried about it being waterproof, but I foresee a problem with the door windows. The plastic window panel is recessed away from the door and although they provide a rubber tube as a gasket, the recessed part will fill up with water with no way to drain out, unless it either dries up days later or leaks out past the gasket. I wouldn't want this if I lived in a rainy area of the country. They give you screens for the front and back air vents, but there are plenty of other places critters can climb right in, mainly where the roof meets the side corners. You'd have to caulk these four spots if you really wanted to bug-proof it. As for security, well, face it. Any decent thief is getting in if he wants to, so don't buy this to protect valuable tools or whatever. The only way this shed would be secure is to be located in Area 51 where it's surrounded by 40 miles of government desert land with armed patrols and motion sensors. If you are doing it by yourself, buy an assortment of Bungee cords, to help get holes to line up when you don't have anyone else to push/pull here and there, especially with the roof panels. I thought I'd never get all 48 screw holes to line up. The space I needed to put it was half-on, half-off my patio, which caused some of the alignment issues despite my best efforts to build a platform level to the patio. I also found it extremely helpful to get a box cutter or Dremel sander and cut off various pieces of plastic left over from the molding process, especially where male parts need to be inserted into female slots. This will save you a whole lot of banging away with a rubber mallet. I caught on to doing this halfway through, and after cleaning up the parts, they simply slipped into place effortlessly.
A**T
We Love Our Little Shed!
Well, half a day to build the foundation (YOU REALLY NEED TO INCLUDE IN THE DESCRIPTION OF THIS PRODUCT THAT YOU MIGHT SPEND UP TO $200 FOR A FOUNDATION), half a day for husband to complete "preassembly" in our warm and dry garage, then seven hours in the snow, rain and sunshine (and mud), our shed is done, and we love it! We began with laying concrete blocks in four corners (leveling as we went) then carrying out of the garage and placing our prebuilt foundation (still level, hooray). Due to the snow, then rain, we put our 10x10 awning over the placement site. The shed went together fairly easily. We were very glad that the preassembly was done. There were a few mislabeled screws and we did have to drill out two truss holes, but all in all, for two pretty basic DIYers, we were quite proud of ourselves. Now, our biggest problem was that when we put the doors on, they would not close. Though the foundation was level, apparently the entire shed was slightly askew. We figured out that the she'd needed to be boosted on one side. We were able to slip a hunk of rock under one side, which fixed the problem! Now I'm excited to make it "cute" with pavers around, pots of flowers, etc. We live in the mountains of Oregon where temps dip below zero often, we get snowed in regularly, and the wind howls. It will be interesting to see how our shed holds up!
Trustpilot
Hace 2 semanas
Hace 2 semanas